|
Nigel Richards Photography Experiments in Infrared About Exhibitions Contact Links Home Buy
|
|
Experiments in Infrared by Nigel RichardsI was always interested in the results from infrared photography but with film cameras never really got around to actually trying it for myself. Growing plants and vegetation reflect infrared light and look lighter than normal when taken with an IR sensitive camera, blue sky looks very dark and will contrast greatly with clouds. It's an interesting, dramatic effect. Digital cameras normally have an infrared cut filter built into the filter that is mounted internally in front of the sensor, this is to stop the infrared light from reaching the sensor and causing unwanted effects however all filters are not the same strength and some let more infrared light through than others. Experimentation is needed. The purchase of a cheap infrared pass filter gave me the opportunity to experiment with various digital compact cameras I have access to. The Infrared pass filter is mounted in front of the lens and tries to stop any visible light reaching the sensor, only infrared light is allowed to pass. The internal infrared cut filter immediately in front of the sensor tries to block infrared light but invariably lets some through depending on the strength of the filter. The consequence of this is that some infrared light gets to the sensor and very little visible light. Initially I bought a gelatine Ilford SFX filter in Cokin P mount size, not a pure IR filter but close, to the eye it is opaque. I held this in front of a number of digital compact cameras and Digital SLRs to see the effect, most of them gave a reasonable infrared effect but the exposure needed varied enormously from “instantaneous” to long exposures of 30 seconds or more. Canon Ixus 950 ISThe most sensitive camera to IR light was a Canon Ixus 950 IS camera, exposure were as short as 1/50 of a second in sunlight allowing the camera to be hand held, the results were very interesting and showed a dramatic infrared effect, however some images did tend to show a hot spot, a circular light area in the middle of the photo and also exhibited a lot of digital noise making good quality large prints very difficult. To mount the gel filter on the camera for serious testing I improvised with a holder made from a discarded plastic 35mm film case with a hole cut in the end to mount a cut circle of the gel filter, this coincidentally just pushed over the front of the Ixus lens when extended.
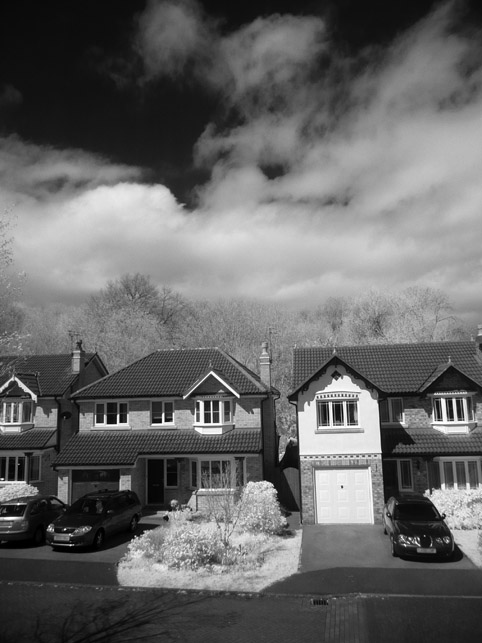
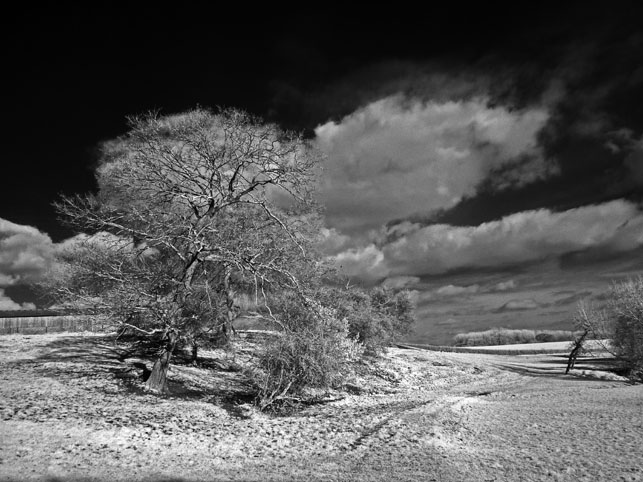
Photograph taken with Ixus 950 IS and SFX filter. 1/20 second exposure. Canon 5DThe next experiment was with a 77mm Wratten 72 equivalent infrared filter bought very cheaply from China via e-bay for my Canon 5d full frame sensor camera and the Canon 17-40mm lens. Exposures were very long, with the lens stopped down sometimes in the region of 30 seconds so a tripod was essential. The 5D mk1 doesn't offer live view so composing the shot was difficult because the SLR viewfinder was black (the filter is opaque), a clip on finder in the hot shoe would make life easier. The results were excellent, sharp and with little noise even when iso 800 was used. The slow shutter speed added an almost ethereal quality to the images. No hot spot was evident.
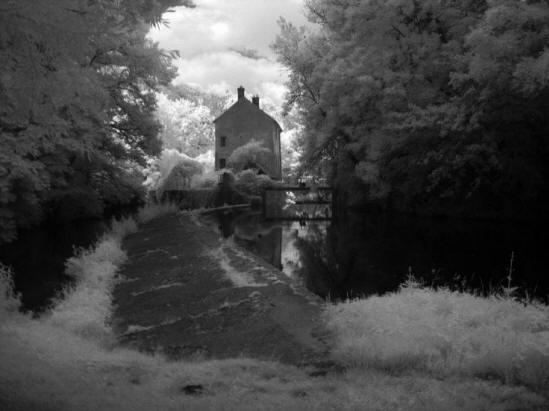
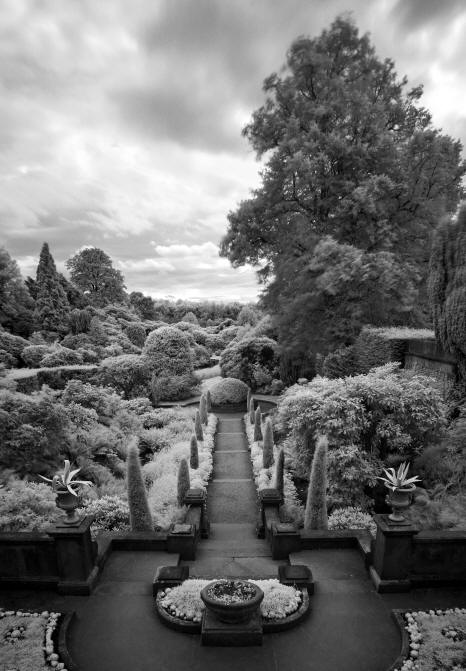
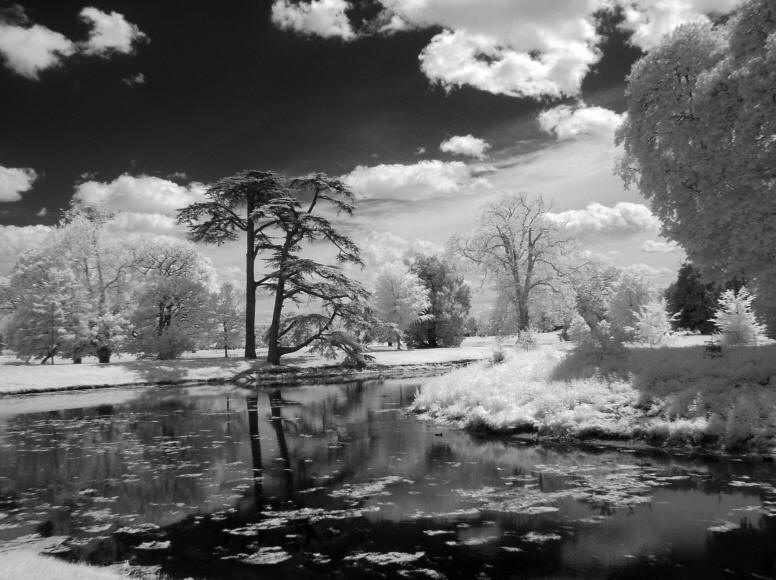
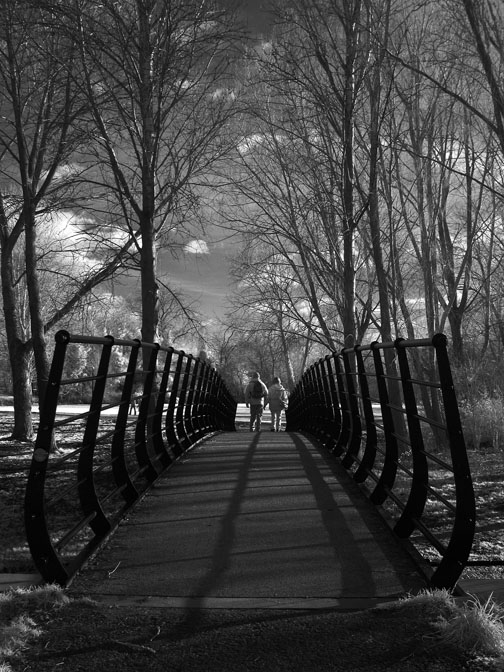
Biddulph Grange, Canon 5d, 10 second exposure, Wratten 72 equivalent
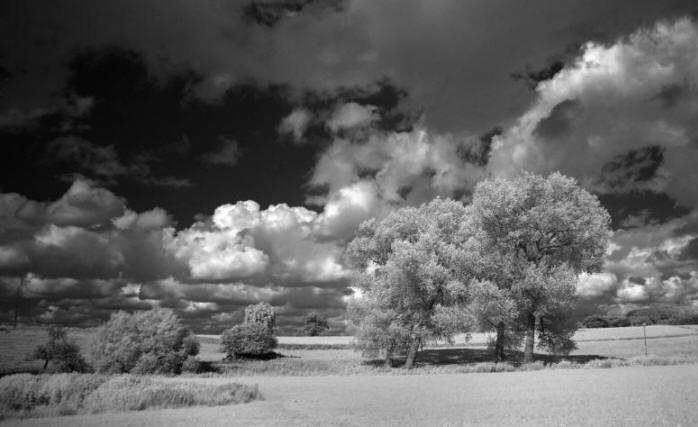
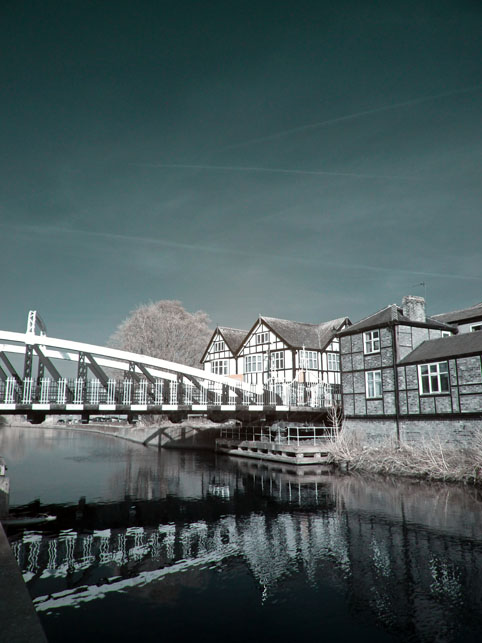
Middlewich, Canon 5d, 1 second exposure, Wratten 72 equivalent Olympus D380.The long exposures and the black viewfinder made me wish for a better solution so having bought an Olympus D-380, 2 megapixel camera from a car boot sale for £1, I decided to strip it and see if it was possible to replace the in built infrared cut filter that is in front of the sensor with plain glass to allow infrared light to reach the sensor. From research I believed that this would give me short exposure “hand held” photography, with the option to compose the image on the screen or in the viewfinder. I do repair the cameras in my collection so this wasn't as daunting a task as it sounds. First make sure the camera is actually working……… The following is not a precise description of the process but will give a good indication of the major steps in the conversion. Searching on the internet can give useful information on disassembly of many cameras. The modification is totally at your risk, I hold no responsibility if you damage the camera or give yourself a nasty shock from the flash capacitor.
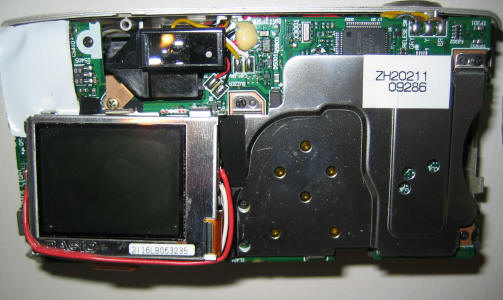
The converted Olympus D-380 2.0 megapixel camera is shown above with a small piece of Ilford SFX Infrared filter held under the plastic lens surround. Stripping the camera to get to the sensor was easier than I had thought, in this particular model there is basically one printed circuit board, a metal shield, the screen with a ribbon connector and various screws that hold the board and the lens assembly in position, once removed the sensor is accessible. It is a good idea to take digital photographs of every stage of the process in case there are problems when it comes to re-assembly. I keep a digital camera permanently on my desk for that process. The lens assembly is held in place by a couple of gold coloured screws, no unsoldering was needed.
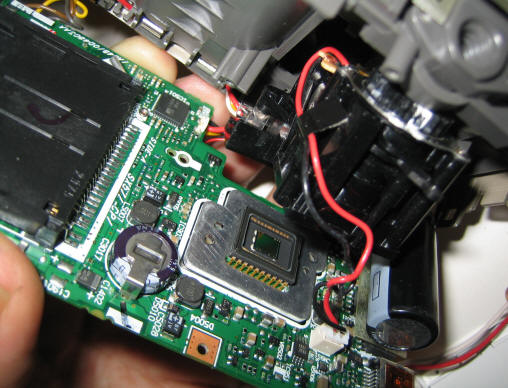
This shows the D-380 with the back cover removed showing the screen, the shield and the main circuit board.
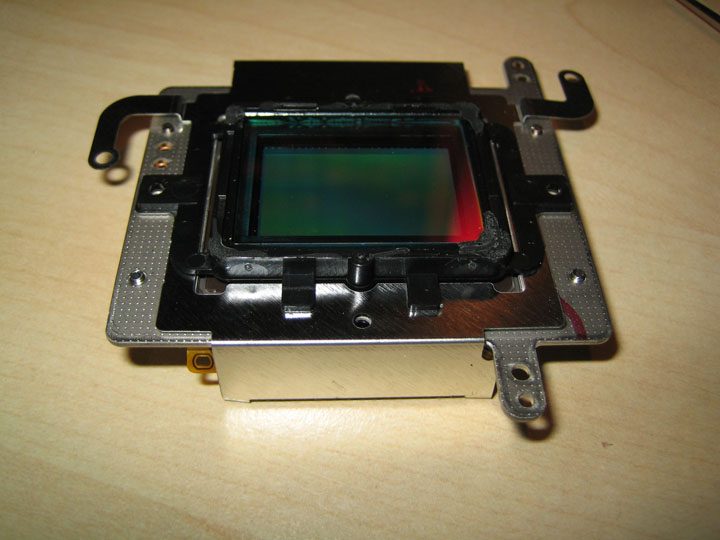
The camera is shown with the lens assembly separated from the main board revealing the sensor. The flash capacitor is the black tube on the right of the picture. Care should be taken with the flash capacitor because even with the batteries removed it can still hold a lethal charge. It may be safer to learn how to discharge the capacitor before proceeding, search on the web, it is easy to touch the contacts with your fingers, I speak from experience. Once the lens assembly is separated from the board the sensor can be seen, don't touch the surface of the sensor because it will be almost impossible to clean. The IR cut filter is held loosely in the lens assembly by a rubber plate, it can all fall out when you separate the lens assembly from the sensor. The wires for the auto iris mechanism can be unplugged from the board to make things easier.
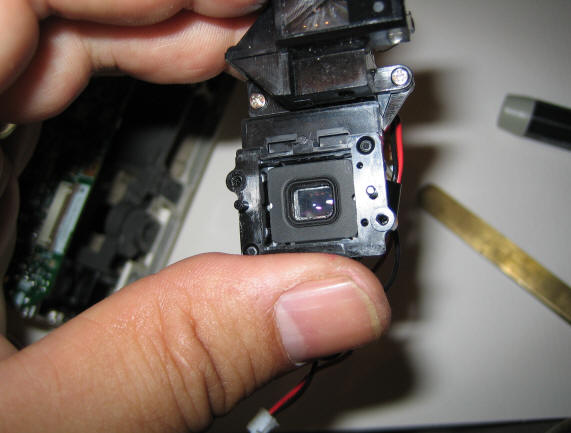
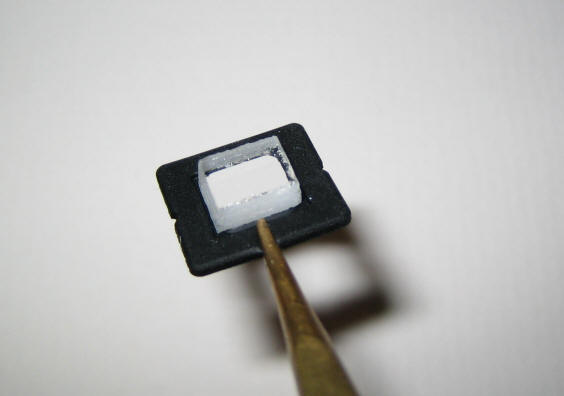
The back of the lens assembly showing the IR cut filter behind a rubber plate. The rubber plate is easily removed and then the filter will fall out. I carefully measured the filter size and thickness so I could make the clear glass replacement. The replacement clear glass filter shown mounted on the rubber plate. The rough edges can be seen. The replacement clear glass filter is made of several layers of clean microscope slide and cover glasses bonded together with a UV curing glass glue. It must the same thickness as the original filter to make the camera optics focus correctly. I rough cut the glass before bonding and then trimmed it to the correct size with a diamond tipped cutting disk. The actual sensor sensitive area is much smaller than the new glass so you can get away with slightly rough edges. I cleaned and re-cleaned the glass at every step to avoid bonding dust into the assembly and covered the outer surfaces with tape when I trimmed it to size. Re-assembly is simply the reverse of the above process. As well as replacing the IR cut filter with clear glass you also need to introduce the IR pass filter in the light path to stop the visible light from entering. With the D-380 there is a thin plastic surround to the lens glued on to the front of the camera. It has the openings for the lens and viewfinder, if this is lifted up it is possible to put a small piece of Ilford SFX gel filter under the plastic and in front of the lens. (see the first photo of the camera above) It may also be possible to adjust the critical focus of the lens whilst this cover is removed as there is a hole giving access to the lens mechanism. This hole may need to be enlarged. Once the camera is re-assembled batteries can be put in and the camera tested. If it doesn’t power up, dismantle it again and check everything is ok, refer to the photographs you took during the disassembly process. First tests were from the bedroom window.
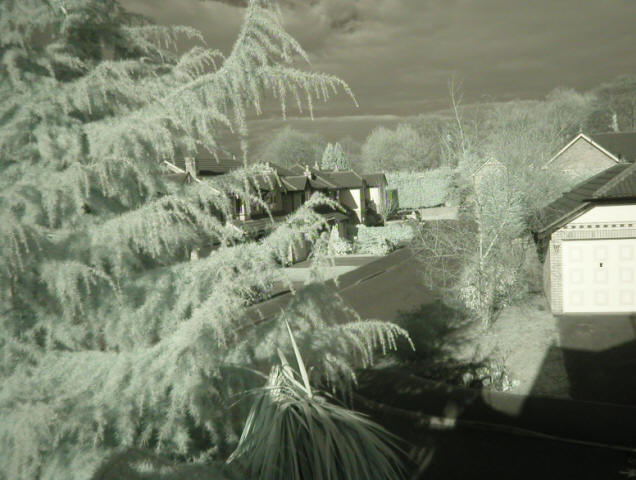
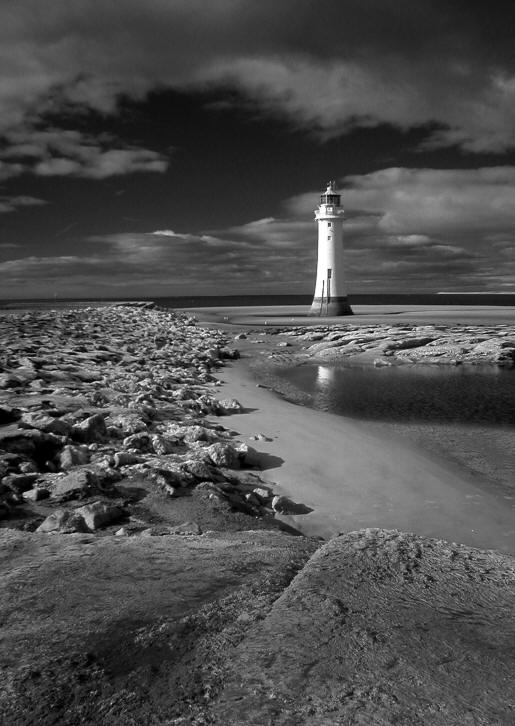
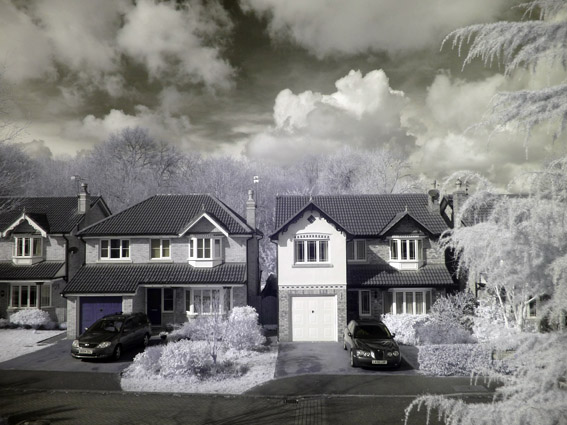
First test of the converted D-380, hand held with an automatic 1/125sec exposure, no post processing in Photoshop, the colours are typical. With a fresh set of batteries, sun in the sky and an empty Smart Media card the first real photographs were taken on a trip to the Wirral. The light house at New Brighton with a blue sky, white clouds and low tide proved an ideal subject. Again the camera was hand held and the resulting image was converted to monochrome and the levels adjusted in Photoshop. The first competition I entered with it was as a digitally projected image which from a perspective of ultimate resolution is less critical and won – not bad for a two megapixel camera.
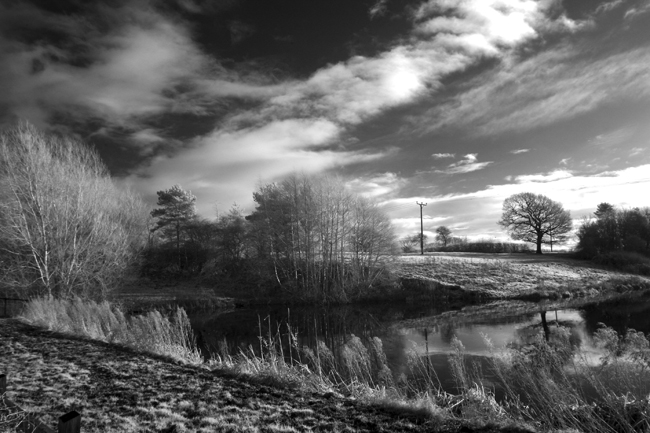
New Brighton lighthouse taken hand held 1/400 second with the converted D-380 Olympus D-550The next camera to be converted was an Olympus D-550 3.2 megapixel, auto focus, zoom camera, another car boot sale find at £2. The conversion was remarkably similar to the D-380 but I was very careful to get the replacement clear glass filter exactly the correct thickness so the autofocus would focus correctly, this is very important, I was even able to mount the gel infrared filter internally in front of the new filter. Results were sharper and far less noisy than the D-380 but recorded images with a slightly different colour, presumably because it is because of a different design of sensor. The zoom lens and auto focus helped give results that could be printed to an acceptable size for print competitions.
Hand held 1/320 second photograph taken with the IR modified Olympus D-550 What's next?The results and the short exposures of the IR converted camera stand for themselves, even when the camera is a simple low resolution compact, I think this is the way to go for the future. I did tried converting an old 2 megapixel Canon Powershot, it was very complicated compared to the Olympus cameras with several circuit boards and many ribbon connectors, unfortunately the focus drifted badly when it was zoomed, sharp at the tele end but miles out at the wide, so for the time being it has been discarded, next will probably be a digital SLR. With this intent a £5, car boot, non working Canon 350D is sitting on my desk waiting to be repaired and then internally converted. The new filter for a DSLR will be much more of a problem as it is far bigger and from experience will show dust etc. much easier. Commercially made replacements can be obtained but they are very expensive. As is self evident my price limit for a camera to convert is about £5. I am considering buying a small sheet of optical quality IR Pass plastic and installing this instead of the existing anti aliasing/IR cut filter that is immediately in front of the sensor. It would have to be the correct thickness and compatible with the different lenses that may be mounted on the camera. Again searching on the internet will indicate which companies can supply suitable filters. I am expecting accurate auto focus will be a problem, complicated because I lack the equipment to re calibrate the focus of the camera body electronically. The cameras are one thing and we all love cameras (don’t we?) but photographically you need to understand what the infrared sensitivity does to the image, I suspect that you can have too many photographs that look like they were taken in mid winter after a snow storm. Once you have an IR capable camera get out and take photographs in lots of different conditions and learn from the results obtained. The gel Ilford SFX filter (89B / W72 filter equivalent) now seems almost impossible to obtain and alternatives need to be found, not tested yet but a possible alternative is a Lee 87 polyester filter. Some suggest that unexposed but developed E6 slide film also works! Update - The 89B filter allows a small amount of colour through allowing the creation of false colours whereas the 89 is just black and white - your choice. UpdateMany digital compact cameras successfully converted using a replacement clear glass filter in conjunction with a SFX gel infra red pass filter using the same principals as detailed above including Sony Cybershots 4.1 and 3.2 mega pixels, Samsung NV3 and Fuji Finepix Z5.
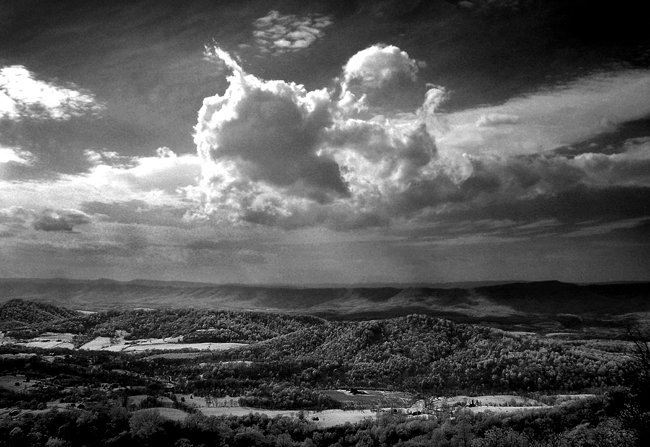
Taken with an infrared converted Samsung NV3 from the Skyline Drive, Virginia USA Best Camera Configuration I tend to always use the camera in colour mode rather than monochrome, if the filter used allows a small amount of colour through this can then be used in creating false colours in Photoshop, setting the camera to mono will of course lose this information. If the camera's White Balance can have a custom setting it can be useful to set it, I usually use a patch of grey pavement or tarmac, the images on the screen will then look realistic which can help composition and understanding of the infrared effect. If it is not possible to set a custom white balance the image will have what appears to be a severe colour cast magenta/pink or possibly green depending on the camera and filter used, this is not a problem as it can be sorted in Photoshop, contrast can be adjusted and the image set to monochrome if wanted.
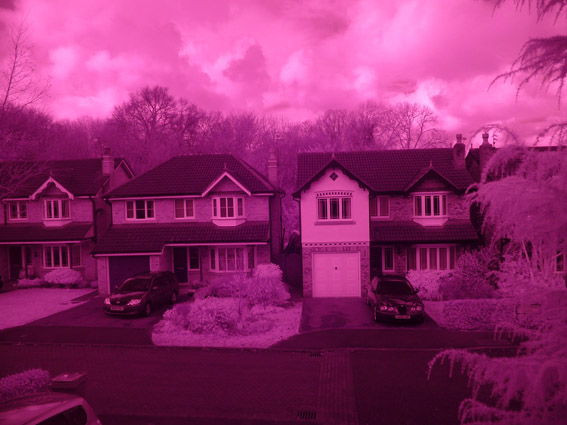
Panasonic TZ5 with 89B filter showing the colour cast when shot with auto white balance rather than setting a custom white balance.
Same scene with a custom white balance taken off the road and pavement. Photoshop Processing The first thing I always do in Photoshop is "Auto Levels", if there is an undesirable colour shift then try "Auto Contrast" instead. You can play with curves or simply contrast and convert to monochrome if wanted. If the camera uses a 89B/W72 type filter then there will be some colour in the image and you can swap the red and blue channels for a false colour effect. Open a .PDF guide to using infrared converted compact cameras by clicking HERE First Digital SLR - EOS 300DI realised that I wouldn't be able to use a gel filter with a digital SLR as it would be impossible to clean with anything other than a simple air blower. My original intention was to use a glass filter derived from a commercially produced screw in IR filter but as I had a Hitech resin IR filter to hand I decided to try that. The original filter was 28mm x 22mm and 2.8mm thick with the Hitech only being 1.7mm this would result in incorrect front focussing however the EOS 300d has some spacers that can be removed to move the sensor about .3mm forward. Without going into the maths you usually need to move the sensor about a third of the difference between the thickness of the original filter and the replacement. This was close enough for a first try. Dust is a major problem both on the front and back of the replacement filter. I was never good at getting glass film slides clean so this is a major issue. I am working on a solution. I believe that a lot of the dust problems were caused by the resin filter, when cleaned before assembly it would gain a static charge which attracted the dust and fluff. If you cleaned one side of the filter with a fine cotton cloth and then turned it over he dust had been attracted to the other side. Remembering the problems when I used to play vinyl records I found my old Zero Stat anti static gun and used that copiously during assembly. The filter was then sealed back in the plastic carrier with silicon sealant all round rather than just the corners. Focus was good even with a 28mm prime lens at full aperture. Hotspots and flare resulted with the kit 18-55mm IS lens but images were much better controlled with the 17-40mm L. Care must be taken when cutting the original filter from its plastic carrier that you don't damage the plastic bits that stick out, super glue repairs were needed with this one.
EOS 300D sensor with replacement Hitech resin infrared filter
Converted EOS 300D, red and blue channel levels swapped.
Converted EOS 300D, levels adjusted and converted to monochrome. Panasonic seriesThese cameras are proving to be the best conversions I have done so far, no dust problems, perfect focus, small and compact.
Panasonic TZ3, 89B equivalent filter
Panasonic TZ65, 89B equivalent filter
Panasonic TZ3, 89B equivalent filter - False colours News Update - it is not possible to convert a Panasonic DMC-S3 as the sensor is permanently bonded to the sensor, shame as it is an excellent small camera with lots of pixels and custom white balance. I believe that the Panasonic TZ 3, 4 and 5 cameras are the best compact cameras to convert to infrared, I think the 10x zoom is less susceptible to hot spots than the later bigger zoom TZ cameras, the only issues are that the earlier cameras can suffer from failed sensors where the only solution is to replace the sensor with a new one. Canon Ixus Canon Ixus cameras including and post the Ixus 70 have proved capable of conversion, prior to this the IR cut filter tends to be held in place with epoxy which makes replacement and accurate positioning difficult.
Taken with IXUS 870IS with 89b type filter.
Ixus 870IS, 89b filter allowing the creation of almost realistic false colours with the Photoshop channel mixer. Micro 4/3 Olympus E-PM1 After several attempts at disassembly I successfully converted an Olympus E-PM1 to full spectrum. I had read on the web that people had converted this camera by simply removing the IR cut filter so I tried it, the anti dust shake filter can be left in place. With the Olympus kit 14-42mm II R it worked fine but with every other Olympus or Panasonic lens I own it wouldn't focus to infinity, there simply isn't enough spare travel after infinity to make it work. Further dismantling, calculations and measuring resulted in a need to either put in a clear filter of equivalent thickness or to move the sensor forward. Olympus mount the sensor with some spacing washers that measured .5mm, I believe I need about .9mm of forward movement but with out surgery to the chassis that wasn't possible. So out came the washers and the camera was re-assembled. Testing showed that 90% of lenses now focussed ok the exceptions were the 9mm fisheye and the pancake 14-42mm Panasonic X lens. I now use the camera as it is with great success however I do miss the fisheye.
E-PM1 sensor removed from the body.
Full Spectrum E-PM1 with a red filter on the lens, channels swapped in Photoshop.
E-Pm1 with conventional 720nm filter mounted on the lens.
Latest conversion is a Panasonic G1 with an internal 720nm filter, you can keep the dust shaker on this model. 9mm Fisheye lens. See infrared photographs taken with these cameras at Infrared Images Olympus E-PM1 with 600nm filter The latest modification is another Olympus E-PM1 with the standard IR cut/ Anti alias filter removed and a 600nm filter installed in its place. The filter was retained as per the Life Pixel method with a double sided tape solution, this is because getting the rubber grommet and the spring clip re-installed proved very difficult but that would have been my prefered solution. The 600nm filter is an optical flat, supplied in a bigger sheet and cut to size, 1mm thick. The anti dust filter is retained but the Olympus spacing shims are removed effectively moving the sensor forward .5mm. the end product is that it focuses to infinity with all my lenses unlike the full spectrum conversion detailed above. Out the camera the foliage has a blue look to it, after swapping the blue and red channels in Photoshop with the Channel Mixer the "goldie" effect is revealed. Image "straight out the camera".
Image after red and blue channels swapped in Photoshop. Nigel Richards MA ARPS - May 2016
|
|
Contact: nigel@nigelrichards.org.uk |
|
All images on this web site © 2021 Nigel Richards |


.JPG)
.jpg)
.jpg)
%20(2).jpg)
.JPG)
.jpg)